
The Eder O’Connor Family at home.
By Derek Eder
This is Part 2 of the series Electrifying Our Old Oak Park Home. You can read Part 1 on installing our rooftop Solar Panels here, and Part 3 on Electric Appliances here.
We are in the process of removing all gas appliances from our Oak Park home and replacing them with electric equivalents. This is a process known as electrification, and it’s one of the most impactful things you can do to fight climate change.
Why? In Illinois, 15% of our total emissions come from the appliances in our homes and businesses, and most of that comes from heating our homes in the winter.

Illinois climate pollution by source, from decarbmystate.com.
Chicago winters are cold, and a lot of people, even many building experts, are reluctant to switch away from gas heating. The midwest, it turns out, is pretty obsessed with heating with methane gas (also known as ‘natural gas’) over all other fuel types. About 80% of homes in Oak Park are heated with methane gas.
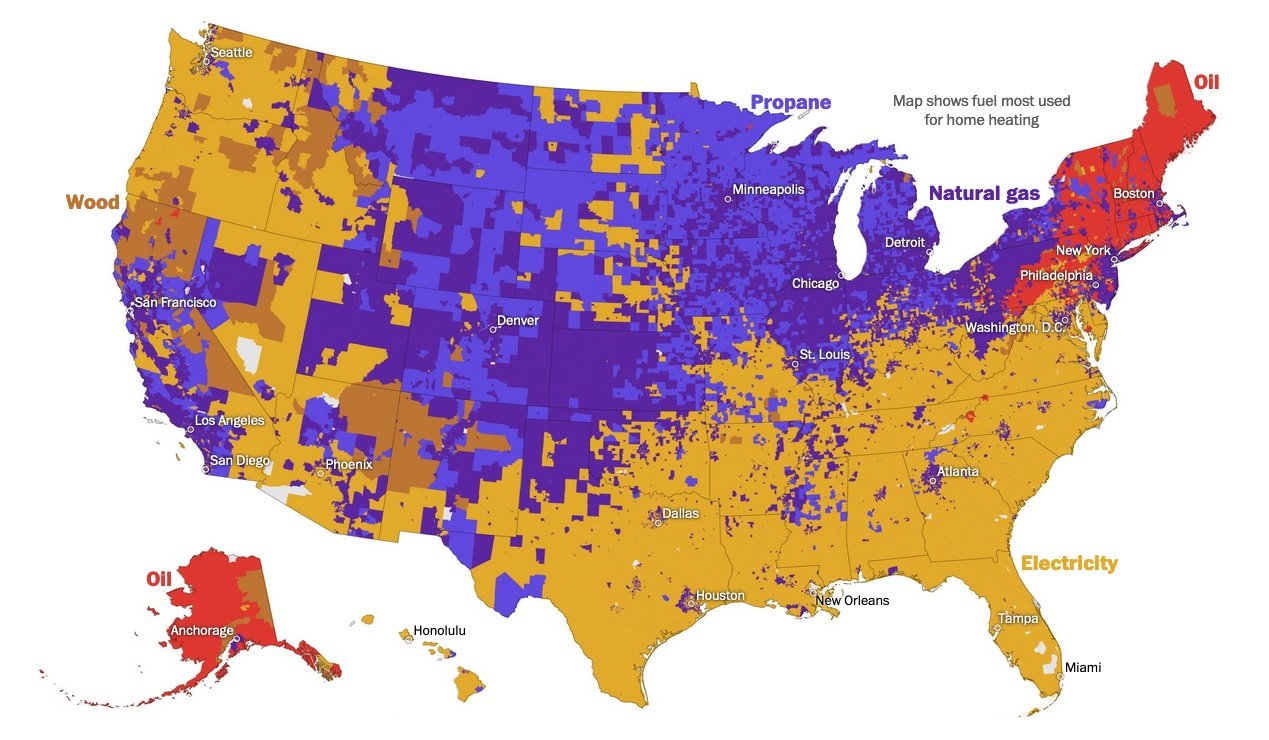
How Americans heat their homes, Washington Post, May 2023.
But climate scientists and the UN have told us we need to get to net zero emissions by 2050 — so all those gas, propane and oil heaters will need to be replaced with electric equivalents soon.
That’s why I’m writing this post. We’ve made the switch from gas heating to heat pumps in our 100 year old home, and you can too. We’ll explain how we took a big step in fighting climate change while also lowering our utility bills and increasing the comfort of our home in the process.
Ready? Let’s dive in.
Table of contents
What’s a heat pump?
What’s a heat pump, you ask? A heat pump is a device which uses electricity to transfer heat from a cool space to a warm space, cooling the cool space and warming the warm space. It is very similar to an air conditioner, except that it also runs in reverse.
In winter, a heat pump can move heat from the cool outdoors to warm a house; in summer, the pump reverses the flow from the house to the warmer outdoors. They transfer —rather than generate — heat, and are up to four times more energy efficient than other ways of heating or cooling a home.

Heat pumps move cool and warm air around depending on the season. Image from mepskills.com.
Heat pumps use the same technology as in your air conditioner or your refrigerator — just packaged up in one device.
Sounds cool, right? Let’s walk through the steps we took to install heat pumps in our house.
Sizing the problem

Say hello to our massive 125,000 BTU/hr (BTUs are British thermal units — cheerio!), 80% efficient, methane-powered, oversized furnace (right).
This gas furnace, installed in 2007 in our 2,800 sq. ft. house, is near the end of its 15-year life. I’ve learned that furnaces like these are pretty common, especially in older homes like ours. Our house doesn’t have great insulation, so to compensate for it, HVAC (heating, ventilation, air conditioning) contractors install more BTUs than you need to get through our cold Chicago winters, just to be safe.
The problem, from a climate perspective, is that this thing is responsible for about 50% of our household emissions. From a comfort perspective, it’s not great either. It pushes really hot air to our rooms and things get very dry in the winter. Switching to a heat pump will eliminate these gas emissions, save us money, and (as we learned later) greatly improve the comfort of our home year-round.
There’s just one problem: they don’t make 125,000 BTU/hr heat pumps, at least not affordable ones for residential homes. A typical heat pump is more likely to produce 30,000–40,000 BTU/hr.
This leaves us with two options: install more than one heat pump, or make our home more efficient to reduce the amount of heating our home needs to keep warm enough in the winter.
For our house, we ended up doing a little bit of both.
Just how leaky is our house? Doing a blower door test

A blower door test setup (not our house). Image from naeci.com.
Thankfully, we can use science to figure out exactly what our home needs to be heated and cooled. The tool to calculate this is called a blower door test. The test involves a fan set up in an exterior door and is turned on to pull the air out of your house, like this:
The fan is hooked up to a monitor to calculate how leaky or tight your house is. We hired Insight Property Services to do this for our home, and this is the result:

Results of our blower door test.
It’s a pretty confusing report to read, but the number that matters most is the CFM50 value. For those who are curious, here’s a guide to reading this report. CFM50 is “cubic feet of air moving across the fan per minute at the test pressure of 50 pascals”.
For a tight house, you want a number around or below 1,383. For a moderate home, you want 1,975. The other number to look at is ACH50, which indicates how many times your house completely changes its air every hour. Our house has an ACH50 of 8.2, meaning we have to completely re-heat our house 8 times an hour. Yikes!
Our home airflow clocked in at 3,295 CFM50: LEAKY. Well, at least now we have a number we can work towards improving. And improve it we can!
Adding insulation
As part of the blower door test, Insight Property Services walked around with an infrared camera and identified places where cold air was getting in. Here’s a few places throughout our home with noticeable leaks. The darker purple indicates places where more cold air was getting in.

Using an infrared camera to identify places where cold air is getting in to our house.
It turns out, we had a few specific problem areas in our second floor and in parts of our upper and lower roof that were completely missing insulation.
After identifying these problem spots, we hired Intelligent Energy Solutions to fill these areas with insulation. Unfortunately, it meant cutting and drilling into our walls and ceilings a bit:

Adding insulation in our first floor ceilings, air sealing our attic, and adding wall insulation on the second floor.
After adding this insulation, they did another blower door test (science!) and measured our CFM50 rating which decreased from 3,295 to 2,645. A 20% improvement. Progress!
It’s also worth noting that adding this insulation will save us money in the long run and improve our comfort even if we weren’t switching to heat pumps. And it really wasn’t very expensive (more on that in lessons learned).
Aerosealing our ducts
Property Insight Services also gave us a tip on a way to get more heating and cooling out of our existing ducts. Our house has central heating and cooling, which means warm and cold air are blown through ducts in the house to heat and cool all the rooms. These ducts are pieces of metal slotted together which can leak a lot of air as it travels through. So instead of going to your rooms and living spaces where it should, this precious air is wasted in places where you don’t need it — in between your walls and floors.
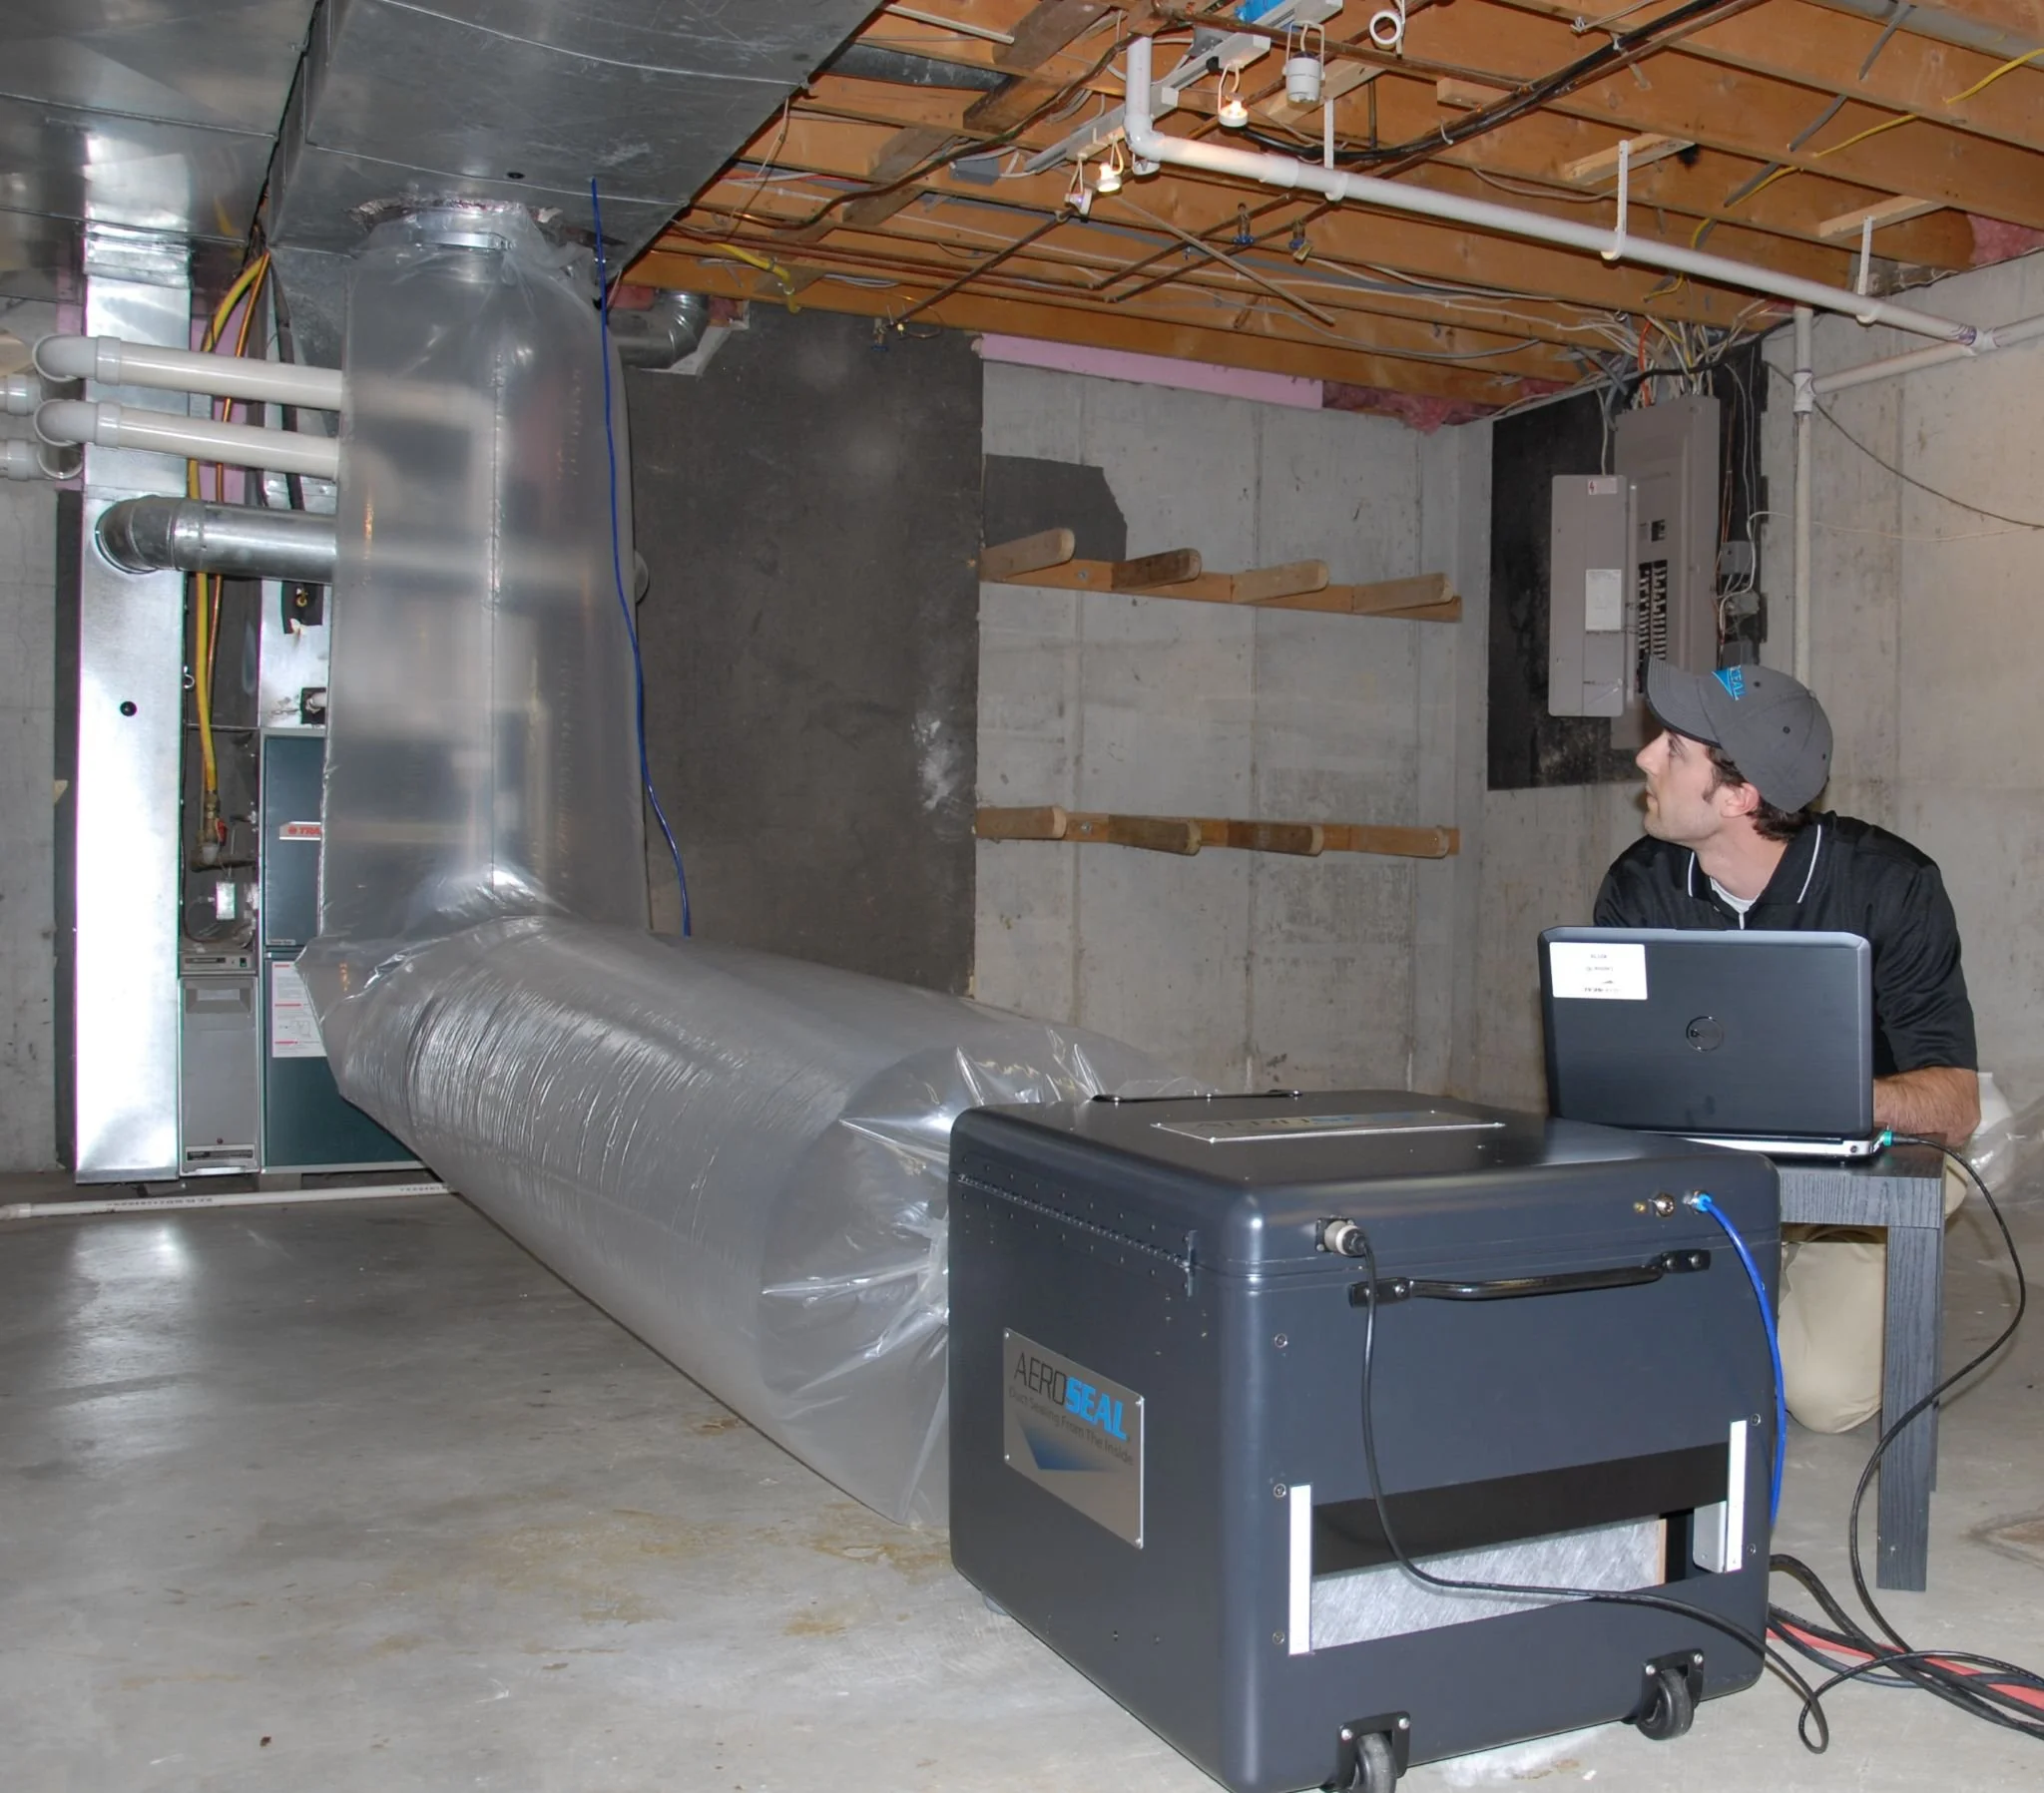
The Aeroseal process (not our house). Image from Aeroseal.
Aeroseal is a patented process that finds and fills those gaps. It works similarly to finding and patching a leak in your car tire. An Aeroseal technician hooks up a fan to blow a (non-toxic) mist of Elmer’s glue-like substance into your ducts. The mist particles naturally move towards the many little holes and start sticking to each other. Eventually, as more and more particles stick to each other, the leaks are filled. Here’s a picture of someone (not my house) doing the Aeroseal process:
Like the blower door test, a sensor is hooked up to the fan before, during and after the process to measure the leakage reduction. We hired Clean Air Pro to do our Aerosealing. The process took about 8 hours. Here’s what our report looked like:

The results of our Aeroseal process.
Before the process, our ducts had an equivalent of a 98-sq. inch hole in them — about 37% of the system capacity. After the Aeroseal process, this was reduced to an equivalent of an 8.4-sq. inch hole, or 3% system capacity — a 91% reduction in air duct leakage.
This process didn’t make our house less leaky, but it did make our ducts much more efficient at moving warm and cold air to its intended areas around the house .
Heat pump installation
With our somewhat less leaky house and much improved ducts, we were ready to move on to installing heat pumps. It took us a while to find an HVAC installer that worked with heat pumps. Matt Nickels from Energy Matters (an Oak Park company) ran a Manual J load calculation and came up with a system that was all-electric and met the required permit specifications from the Village.
Our 125,000 BTU gas furnace was 80% efficient, so our house needed about 100,000 BTU of heat. After our improvements, Energy Matters determined that our home needed about 79,000 BTU of heat. Definitely doable with two heat pumps, supported by some standard electric resistive heating.

BTUs of heating provided by heat pumps and electric resistance. Chart provided by Energy Matters. The electric resistance component can turn on partially at 20 degrees F and fully at 0 degrees F.
We swapped out our gas furnace with a 3.0-ton Mitsubishi Single Zone Hyper-Heating heat pump system supported with an electric resistive heater for temperatures below 20 degrees Fahrenheit. This gave us about 70,000 BTU, which is enough to heat our first and second floors.
It is worth noting that while the electric resistive heater component gives us a lot of cold weather heating, it is not very efficient and should only be used when we need it. This is why the 20F degree threshold is so important. If we ran the resistive heater at say, 40 degrees F and below, it would be on for many more days of the year and significantly increase our energy usage. When HVAC experts warn about how switching to electric could potentially cost you more than gas, this is what they’re talking about. This is why insulation and air duct efficiency are critical — it lowers our energy needs to make the heat pump system viable.

Our new outside heat pump condensers.

3.0-ton Mitsubishi Single Zone Hyper-Heating heat pump system.
In Chicago, about 85% of our heating days will be above 20 degrees F, so we will not need to use this expensive electric resistance very much.

1.5 ton Mitsubishi Singlezone Hyperheating Heat Pump system.
We still needed to account for the remaining 9,000 BTU. To get us there, we decided to turn our basement into a second zone and add a 1.5-ton Mitsubishi Single Zone Hyper Heating Heat Pump system, which provides up to 19,000 BTUs. More than enough for our needs.
Both of these heat pumps were installed over the course of three days. They each came with their own new condenser, replacing the one we had for our previous AC. As a bonus, these condensers are much quieter than our old AC condenser.
An unexpected bonus: Improved comfort and air quality
After the first day of using our new system, we noticed an immediate improvement in the air quality and comfort within our home.
Our old gas furnace is what they call a single stage. That means it’s either 100% on or off with no variable fan speed in between. This meant that, especially during the milder fall and spring months, it turns on for just a few minutes at full blast and then shuts off. This leads to short bursts of heating and cooling that don’t do a good job reaching all of the rooms in our house.
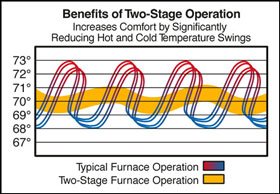
Difference in temperature swings between a single stage heater vs two stage. Image from perryaireheil.com.
Heat pumps are different. Instead, they are designed to be constantly on and adjusting both temperature and fan speed as needed. This results in the air being continually cycled, which makes the climate in our home noticeably more comfortable and consistent between rooms and floors. Before, we would notice a big temperature change when going up the stairs from the first floor to the second floor. The second floor, where our bedrooms are, were colder in the winter and hotter in the summer. With the added insulation and heat pump system, I’m happy to say that we do not feel that change at all now!
An additional bonus is our air quality. The air exchange filter on our new system is 4 inches wide, instead of the 1-inch filter we had on our old one. This system is much better at filtering out dust and pollen than our old one, and we really noticed a difference.
Bottom line costs and incentives
All told, with the insulation, Aeroseal and installing the new heat pumps, this project cost us $25,940 after rebates. You can see the full breakdown here:

As you can see, we were able to get a $2,000 federal tax credit. For low-income households (under 80% of Area Median Income), the Inflation Reduction Act (IRA) provides up-front electrification rebates covering all heat pump costs up to $8,000. For moderate-income households (between 80% and 150% of Area Median Income), the electrification rebates cover 50% of heat pump costs up to $8,000.
Another thing to note is our gas furnace was at the end of its life and we were due for a new one anyway. If we had replaced it with another gas furnace, it would have cost us between $10,000–$12,000.
Additionally, our gas bill has been greatly reduced (we plan to shut it off completely once we electrify the rest of our appliances) and thanks to improved efficiency and our solar panels, the cost of running our system is also greatly reduced. We’ll need at least a year to determine what the annual cost savings is, and I plan to update this blog post when that happens.
Until then, for us, the investment has been worth it. We have improved the comfort of our home and we are no longer contributing nearly as much climate pollution from burning methane gas. We have taken a significant step to reduce our contribution to climate change and helped give our children and future generations a better chance at a bright future, which to us, is priceless.
Stay tuned for the next post in this series — electrifying everything else: our hot water heater, stove, clothes dryer and car!
Lessons learned
Throughout this process, we learned some important lessons that will hopefully be helpful for you. The biggest one is that while going 100% electric is possible in cold-weather climates like Chicago, there is still a lot of skepticism of its feasibility, especially by some HVAC industry professionals. We met with several who either thought we needed to stick with gas, or that switching to electric would lead to dramatically increased utility bills.
This skepticism is understandable. HVAC professionals are likely to stick with what they know has worked before, and heat pump technology has only recently gotten efficient and large enough to work on large drafty homes (like ours) in low temperature climates. Many of the models, like the Mitsubishi heat pumps that we installed, are relatively new. So if you are met with similar skepticism, stay persistent and find an installer who is familiar with the latest technology.
HVAC installers have a wide range of conflicting opinions: This was the biggest hurdle for us to overcome. Over the course of 6 months, we reached out to and got quotes from many HVAC installers. Most said they just don’t install heat pumps. Some said they do, but can’t recommend going 100% electric. One even proposed we install 5 mini-splits for $70k, one for each floor and bedroom, and completely ignore our existing ducts — a ridiculously wasteful and expensive proposal. Eventually we got quotes from Energy Matters and On the Mark HVAC and they had similar 100% electric and reasonable proposals. Until this point, though, I was very discouraged by what I was being told from industry professionals. My advice to you: stay persistent and use the knowledge from this blog post to empower your decision making.
Insulation really does matter: We could have skipped insulating, but it would have meant installing at least one more heat pump and spending more energy to heat our home year over year. For $2,300 of insulation, we reduced our home’s energy needs by 20%, which will pay for itself many, many times over. If you want to save money, don’t skip this step!
Going solar first helped incentivize us to electrify: If you read my previous blog post, you’ll see that we installed solar panels on our roof first. For us, this helped incentivize these other improvements because our electricity costs are low / free. Going solar first may make sense if you can afford it. Otherwise, you may want to do it later or not at all.
You can save money by spreading these improvements over several years: The Inflation Reduction Act allows for a 30% rebate, up to $2,000, each year for making improvements to your home appliances. To maximize savings, it may make the most sense to spread these improvements over several years.
Resources
Solar and heat pump installers in Oak Park: https://bit.ly/electrify-your-oak-park-home
Decarb My State: look up where U.S. emissions come from, on a state-by-state basis: https://decarbmystate.com
How much money will you save from the Inflation Reduction Act? https://www.rewiringamerica.org/app/ira-calculator
Electrify Everything Home Guide: https://www.rewiringamerica.org/electrify-home-guide
Identify what heat pumps and other equipment are eligible for Federal tax credits: https://www.energystar.gov/about/federal_tax_credits/non_business_energy_property_tax_credits
The Electrify Everything Course by Nate the House Whisperer: https://www.youtube.com/playlist?list=PLLTtM5Ga_CUtT-SB20vtU2y2EwtrwC6B6
Cool Calc Manual J - calculate your heating and cooling requirements for your home: https://www.coolcalc.com/